Wednesday, September 29, 2010

Maya Space Ruin Preproduction

I was thinking about creating a creature space ship that could also make its way into the depths of the ocean. It's a mantaray form with a steamboat wheel as propellor and living quarters underneath. I'm thinking about adding some piping for extra oomph.

These photos are my inspiration.
Pretty much just copied this. I'll have to change that.

Proud Steamboat
Looking at some of these exhaust pipes
Help to get the overall shape of a manta-ray
From below
From Side

Straight On
From Above


My Pretty Special Steamboat Wheel
The manta ray was made by extruding a plane and then working with the vertexes, edges and faces to mold the shape that I wanted. I turned on the smoother which gave a beautiful look to the manta ray, but unfortunately it did not render out that way. I will have to investigate further.

Motion Tracking in After Effects

For this first video I tracked the basketball that the kid was playing with. The color stood out fairly well so it was a particularly easy capture with the need to adjust the tracking point a few times. Once the motion path was approved I placed a lens flare onto that layer. In the motion tracking window I selected the lens flare as the target of the motion path and voila the lens flare was attached to the movement of the ball. This kid will definitely be prepared for the 2059 olympics when we play in outer-space.


Kid Playing with the Lens Flare Basketball from Caitlin Lundin on Vimeo.


For the second video I wanted to play with tracking an image using corner pins to match up a square image with a video of a square object. The video is fairly shaky so the corner trackers had plenty to match up with.


Motion Tracking Dog Billboard from Caitlin Lundin on Vimeo.

Three of the four had little trouble with the location of the track, but the bottom right had more trouble. It was hard to make the hand tracked corner look as smooth as the others, so I tried to cover it up with a stock photo of a tree. I adjusted the photo in photoshop in order to match the tone and contrast with the video better. When I brought the still image into After Effects I put a grain filter over it and match a gray grain to the rest of the video. I parented the still tree to a null object that I had made the target of the motion path. The tree flails awkwardly in the wrong direction. I think this could be fixed with maybe having two corner pin motion tracks for the tree to follow. That may smooth out the movement.

Sunday, September 26, 2010

Thursday, September 23, 2010

Easing and Parenting

I just got After Effects on my home computer so watch out it'll be getting crazy pretty soon. For this project I worked with parenting and eases.

I took the blob fish and yellow submarine into photoshop and eliminated the backgrounds and created the suction cup that's on the bottom of the submarine. I took the suction cup into the layer window and used the puppet pin tool to wave it around and make it suck. Back in the composition I parented the suction cup so that it would stay with the submarine. The blob fish was a little different. I made two different blob fish layers that start and ended at different times. The first one ended right before the blob fish is sucked up. The other one starts immediately after. I did this so that I could parent the fish with the submarine only after it was sucked up. 

The motion of the submarine was eased down so that it would approach the blob fish slowly and then it was sped up so that it would fly away. This was done with a bezier curve to the timeline. 

Due to problems with vimeo and youtube I can not put this video online yet. I will work on it and have it here soon.

Wednesday, September 22, 2010

Building in Maya

I wanted to  created a scene using the techniques of extruding, lofting, revolving and planing, so I looked up a fairly simple building sketch online to sort of follow.
Here is the original sketch.
I chose it because the isometric view of the building could help me get a grasp of what its different sides looked like.
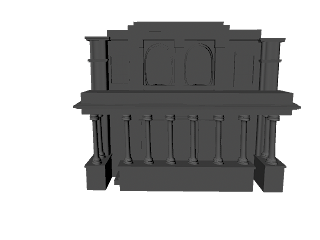
Here is the recreation I made in Maya.
Front View
Side View


There are obviously some differences between the two but I wanted to focus on building the shapes and getting the feel right as opposed to exactly capturing the sketch. In a future endeavor I will more closely follow the original sketch. 

The columns are a curve that was rotated around the y-axis. The window panes are NURBS squares that were laid within one another and then the whole thing was planed in order to leave the panes empty and create a frame around them. A further framed it with cubes to fit just to make the windows stand out more. The curved windows in the upper center portion of the facade were created by extruding a tube out from a circle that I altered to fit the design I wanted. 

I have to admit that I could not find a reasonable use of a loft on such a square building like this so I made a flower to put out in front of the building. 
So Pretty


The Flower From Behind
The flower was created by lofting several wavy curves and then flipping it so that the bottom was visible. This is the underside. I did some further adjustments in order to give the petals some depth. The stem from the flower is a circle that has been extruded back on a funky curve. The design of the line that it was extruded from was further altered to work with the stem look. 

I hope to in the future add some texture and color to my building and build a scene around it. 

Wednesday, September 15, 2010

Perspective Pet Shop

Two vanishing points were established to help build the proper perspective for the buildings. Windows and doors were added using the same vanishing points and color was added. It was decided that the sun would come from the left and behind leaving the shadows on the bottom and the right. For the shadowy areas I tried to throw a little light up from the area around it. Where the building meets the street I used an opaque brush with a lighten setting and a gray color. For the areas where the sun was hitting I used a yellowish opaque lighten brush to add some color.

  The turtle tank was an attempt to understand how light works in water. It will take much more practice to get there, but I'm glad I did it.

After Effects

I started with the basic frame and added the layers of a photoshop project to it. I isolated the whale layer as a composition on it's own so that I could use the puppet tool to create the flopping and dragging from the still 2-D drawing. I broke the body into two sections with puppet pins so that the tail and head could move separately. Once the whale was infused with puppet motion I transformed the flopping whale from off the screen to the middle. The text also has a simple effect placed on it that is aligned with a sound effect.


Whale vs. Spiny Lizard from catlin lundeen on Vimeo.

Wednesday, September 8, 2010

Mapping Unto a 3-D Sphere

For this project I created a lambert and attached this visual and mapped it onto a sphere. The first two images are from inside the sphere. The third one is of the sphere's exterior. I did not adjust the UV because I liked the way that the picture sloped down towards the bottom. I think it worked well with the destructive look of the picture that I used. 

Species Unknown

I also created this creature to see how I could mesh the different polygons to make a new construction. It was just to get a little more acquainted with Maya. 

Photoshop Project

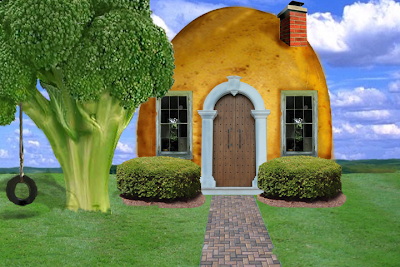
Potato House 
For this project I wanted to make a landscape out of food. Once I got started however I thought a humble little potato house and broccoli tree would be a good start with my first time with photoshop. I had fun working with the layering trying to get perspectives right. When I first put the potato house down it cut into the landscape too much and looked too flat, so I thought to hide the base with some bushes. This helped, but I think there is something funky about the bushes in front and I couldn't figure out how to make them look like they better belonged. Lucky for me the internet is full of pictures of vegetables with good lighting and white backgrounds so eliminating elements that weren't part of the final project were a breeze.

Putting the door, windows and chimney on the potato worked when I used the multiply setting on the paint brush to add a little shadowing to make them look like they're there. I also did a little shading in parts of the broccoli tree.

I'm proud of this as my first interaction with photoshop as a program, but I need to improve on perspective and shading.